Setting Up A Project
Here is some media to use if you’d like to follow along. It’s all cats.
After Effects works a little differently than a dedicated video editing program like Premiere. Instead of working with lots of shots simultaneously, After Effects is really designed to create single shots or sequences. You can edit in After Effects, but the workspace and method of playback aren’t really designed for it. Instead, it’s pretty common to work on shots in After Effects, export them, and then bring them into Premiere for editing.
When you open up After Effects, you’ll likely see a splash graphic with the usual options for starting a new project or opening an existing one. After Effects does not require you to set a project location or save before you start working. I’d recommend keeping everything organized in a central folder, sorting your media by type, and saving frequently.
In After Effects, you’ll be working in compositions. You can create a new composition by hitting Cmd+N, selecting “New Composition” from the Composition dropdown menu, or by clicking the icon that looks like a scene inside a filmstrip at the bottom of the Project panel. You’ll be greeted with a menu that gives you options for resolution, frame rate, and the duration of the composition. There are several presets to choose from and they are actually pretty helpful. For this class, you’ll mostly use the HDTV 1080 24 preset.
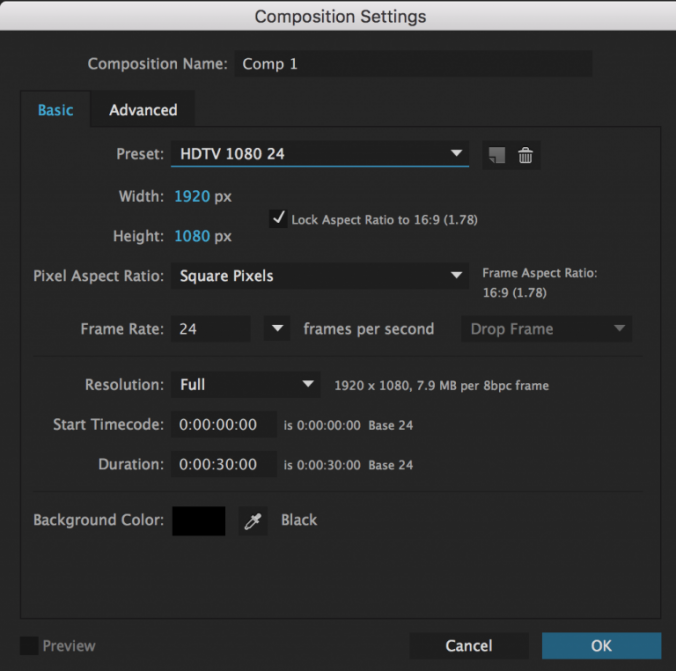
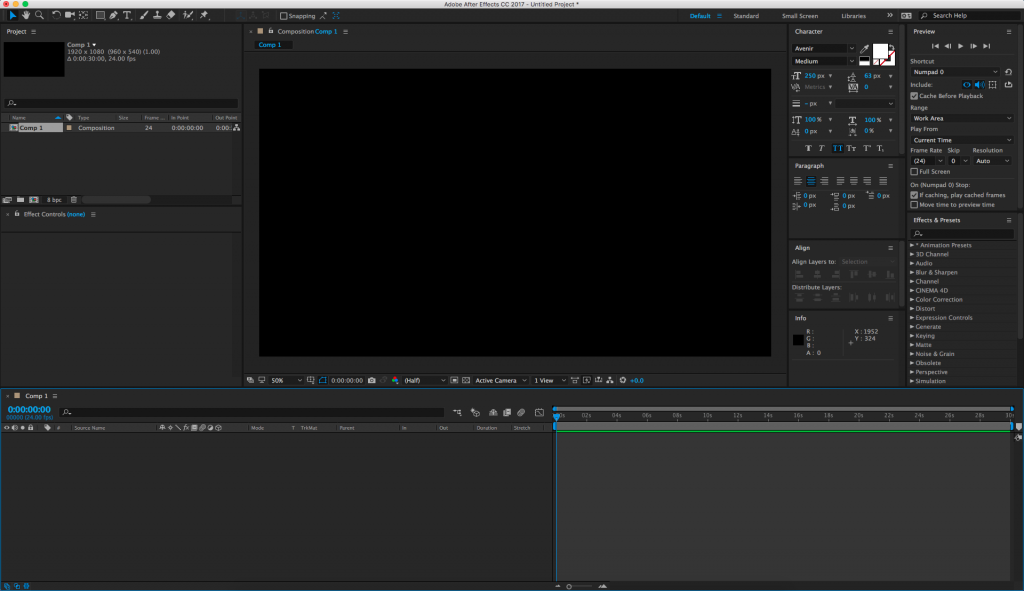
Hitting “OK” will open up a new blank composition. You’ll be dragging media into the Timeline and your work will be visible in the Composition panel. There are no pre-determined audio or video “tracks” in the Timeline window; pieces of media simply stack on top of each other. Every video or audio clip, still, adjustment layer, text, and shape appears as its own layer in the Timeline. You can also drag one composition into another or put footage into a “pre-composition”. You can rename media in either the Timeline or the Project panel by highlighting something and hitting return.
To get media into After Effects, you’ll need to import it. You can import all kinds of things – stills, video, music, 3D files, even other After Effects projects – by going to File>Import>File… in the top dropdown menu, hitting Cmd+I, or just dragging things from the Finder into the project window.
You can also create pieces of media such as solids and shapes to use within After Effects. A solid is a simple block of color. Go to Layer>New>Solid… or hit Cmd+Y to define the color and size of the solid, then hit “OK” to create it. It will automatically appear in the timeline of whatever composition you are working on. To create shapes, use the masking tools (discussed below) without selecting a layer in the timeline. In other words, simply select a mask or pen tool and begin to draw in the composition window. If do you have a layer selected, that layer will be masked instead of drawing a shape – we’ll go into this in greater detail later.
Tools
If you’re using the “standard” layout, you should see a bar of tools across the top left section of the screen. These are what we’ll be using to interface with After Effects, so it’s essential to know what they do. From the left, the first tool is the arrow selection tool. This is what you’ll be using most of the time. Its keyboard shortcut is V.

Next is the hand tool, which moves your view around in the composition window. You can press H to select the hand tool or you can hold the space bar down to switch from your current tool to the hand tool. This is the quickest way to move around your composition.
Next is the zoom tool, which looks like a magnifying glass. The zoom tool is pretty self-explanatory: it zooms your view of the composition window in; hold alt/option to zoom out. This is useful, but a faster way of zooming is by using the scroll wheel on your mouse: scrolling up zooms in and scrolling down zooms out. There are also zoom controls in the bottom left corner of the composition window.
The circular arrow is the rotation tool, which can be selected using the W key. This rotates media in the composition window. Next to the rotation tool is a dropdown menu with several tools related to virtual cameras – we’ll discuss those later in the semester when we go over 3D compositions.
Next to the camera tools is an incredibly useful tool that looks like four arrows in a dashed-line box. This is the pan behind tool and you can select it using Y. The pan behind tool is used to change the anchor point of a piece of media without moving the object itself. This will prove very helpful when we begin to do character animation.
Next to the pan behind tool is a dropdown menu with tools for either creating different kinds of masks or different shapes (Q). Then there are the pen tools (G) which can also be used to create masks or shapes. The horizontal and vertical text tools are next (Cmd+T).
We won’t be using the next few tools for a while, but they are: the brush tool, the clone stamp tool, and the roto brush tool. The last tool, which looks like a push pin, is the puppet pin tool (Cmd+P on a Mac, Ctrl+P on a PC), which is used for character animation.
Timeline Length
When you create a new composition, you are asked to define its length. If you need to change the length of the composition, you can do so by going to Composition>Composition Settings… or using the Cmd+K keyboard shortcut. Changing the duration in the composition settings window that appears will either add or subtract time from the end of the composition. However, you can also trim the composition down from within the timeline panel.
At the beginning and end of the timeline, you’ll find blue handles – these define the “work area.” (There are actually two sets of blue handles – the smaller ones can be used to zoom the view of the timeline in and out.) You can think of the work area handles as After Effects’ equivalent of an in and out point. If you drag the work area handles to the section of the timeline you want to keep, then right-click on the lighter area directly between them, you’ll see a few options appear. Select “Trim Comp to Work Area” to remove everything outside the handles and shorten the length of the composition.

Transform Properties
Let’s manipulate some media in After Effects. The timeline is where you to modify properties like scale, opacity, and position. On the left side of each piece of media (or layer) is an arrow that can be tipped down. Clicking it will reveal three categories of properties that can be adjusted: masks (if any have been added), effects (if any have been added), and a section called “Transform.” These categories always appear – and are applied – in this specific order: first, masks are applied, then effects, then transform properties. If your media includes audio, that section will appear last.
Clicking “Transform” will reveal the following properties: anchor point, position, scale, rotation, and opacity. Most of these are self-explanatory, although “anchor point” can be a little confusing. The anchor point is basically the central point in an image or video and changing the anchor point changes the way an object rotates and scales.
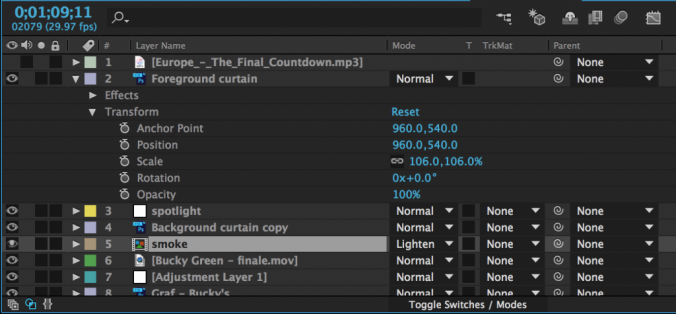
You will be adjusting the transform properties a lot when using After Effects, so it’s helpful to know their keyboard shortcuts:
A – anchor point
P – position
S – scale
R – rotation
T – opacity
You’ll notice that next to every transform property – in fact, next to almost everything – is a stopwatch icon. Just like in Premiere Pro, this icon turns keyframes on and off. Setting keyframes allows you to animate a property over time. By default, keyframes are switched off – you can tell because the stopwatch icon is greyed-out. Clicking the icon will turn keyframes on and a new keyframe will be set every time an adjustment is made to that property.
Whenever you add a keyframe to an effect or transform property, that keyframe will appear as a diamond shape on the timeline. Keyframes can be moved, copied and pasted, or deleted right on the timeline. A group of keyframes can be scaled up or down by selecting them with the mouse, then holding alt while clicking and dragging a keyframe at the end of the group. You may need to experiment to see just how this works, but After Effects is designed to make adding and modifying keyframes very easy. As a result, you can animate properties with very precise control.
To see all the keyframes on a layer, highlight that layer in the timeline and press the U key. I use this particular shortcut constantly.
Playback
There are actually several different ways of previewing the project you are working on in After Effects. The Preview window contains lots of options, which may be hidden until you expand the panel to its full dimensions. By default, there are three basic methods of previewing your composition, each of which can be further customized. Note that these may change slightly from version to version of After Effects, but they can always be customized in the Preview panel.
Pressing the space bar will preview your composition without cacheing the frames first. This means that After Effects will attempt to play what you are working on in real time, as best it can. If you have a fast computer or a simple composition, this may work fine. However, your playback may start to slow down or stutter.
Pressing the zero key on your number pad will cache the frames in your composition before playing them back. This is called a RAM preview – essentially, After Effects is temporarily rendering your composition before playing it back. You may have noticed a green line near the top of the timeline panel. Areas that are green have been cached and should play back relatively smoothly. When you press the zero key, that green line will gradually fill up. When it fills the timeline – or when you press zero again – the preview will play. Note that you must press the zero key on the number pad for a RAM preview – not the zero key in the numbers along the top of the keyboard.
The last type of preview is an audio preview, which is fairly self-explanatory. You activate an audio preview by pressing the period key on the number pad (again, it must be the one on the number pad). This will play only the audio in a composition – no video. When doing an audio preview, you may find it helpful to see a waveform of the audio being played. To do this, simply highlight a layer in the timeline with audio and press L twice quickly.
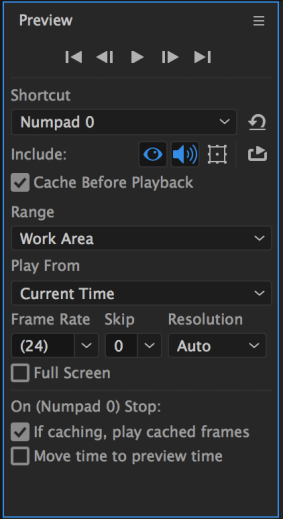
One nice thing about the bevy of preview options in After Effects is that you can really customize how they operate. In the preview panel, you’ll find options for resolution, sound, looping, and much more. You can choose whether the preview plays from the beginning of the composition or from wherever the playhead is. If you always want your preview to play in full screen mode, there is an option for that. Because previewing footage in After Effects is so intensive, it’s extremely helpful to have these options.
Exporting Using the Render Queue
The best way to export in After Effects is using the Render Queue. The Render Queue exists as a panel in After Effects – it may show up as a tab next to the compositions in the timeline (otherwise, you can always find it under the Window dropdown at the top of the screen).

To add a composition to the Render Queue, open the composition in the timeline, then go to Composition>Add to Render Queue. The name of the composition should then appear in the Render Queue panel. Before you hit the “Render” button, you’ll need to set a few parameters. Unless something has been changed, everything in the Render Settings section should be fine at the default values. The Output Module is where you actually make changes to the file type and codec, so click on that to bring up a window with lots of options. For our purposes, just click on “Format Options…” and change the video format to QuickTime and the codec to Apple ProRes LT. Click OK to close each window. Finally, set the file’s name and destination by clicking on the text next to “Output To:”.
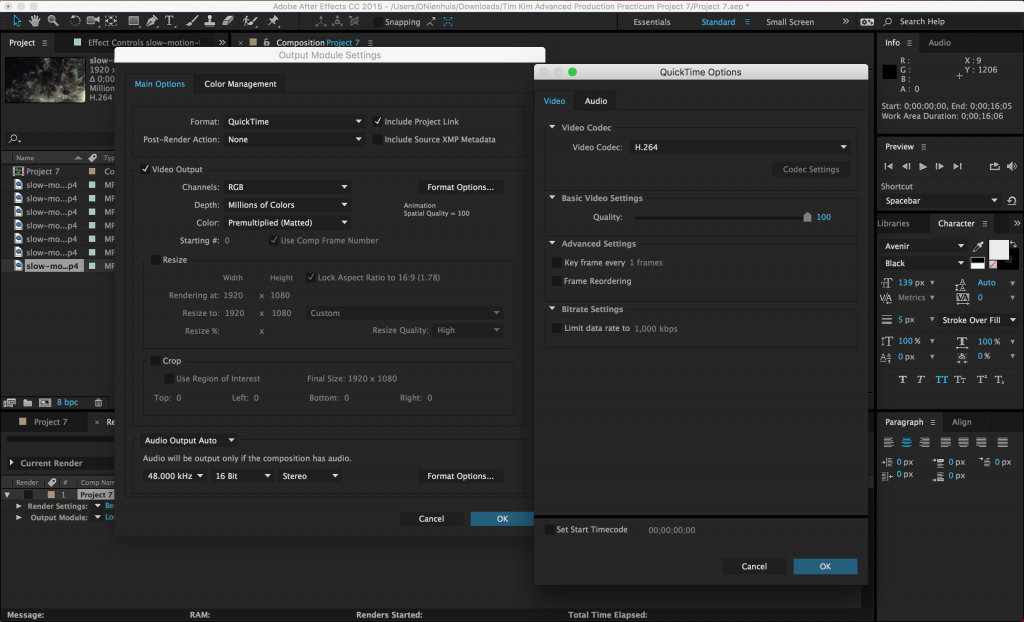
What’s great about the Render Queue is that, if you are working on multiple compositions, you can add them all, then render them together. Just repeat the process of adding them to the queue and adjusting their settings, then hit Render.
